


Instructional Guide: Removing Flexible / Lightweight Solar Panels
This guide walks you through how to remove flexible or lightweight solar panels while giving you the best chance of preserving both the panels and the roof surface. It also points you to some helpful tools and products for adhesive removal.
Before You Start
- Expect a challenge: Removing panels is rarely easy, especially if you want to keep them intact for reuse.
- Most removals are upgrades: In many cases, panels are removed to upgrade or replace the system.
- No perfect method: There’s no guaranteed way to end up with a pristine roof and undamaged panels, but the steps below will maximize your chances.
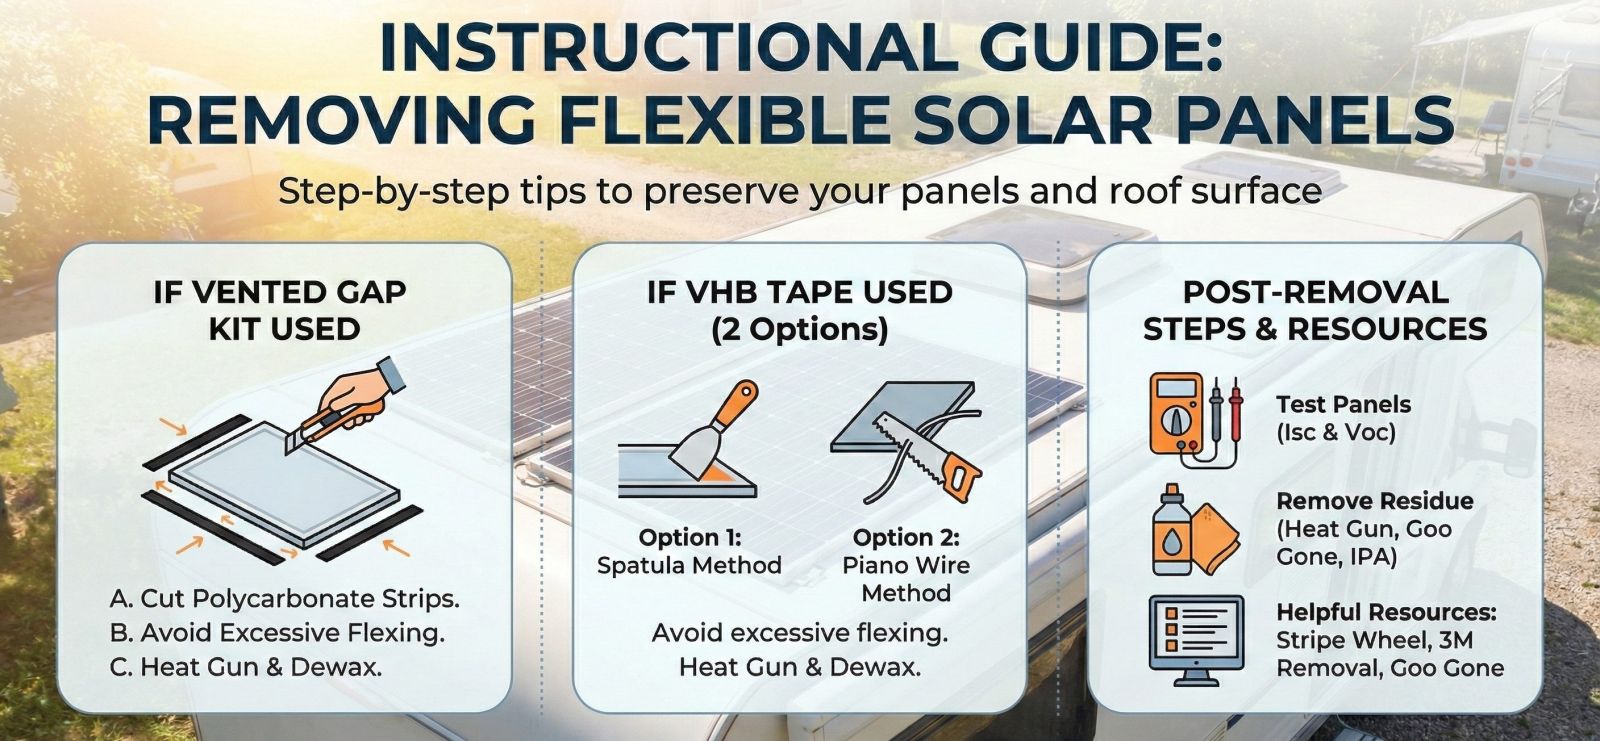
Scenario 1: If a Vented Gap Kit Was Used
These instructions apply when your panels were mounted using polycarbonate venting strips (vented gap kit).
A. Cut the Polycarbonate Strips
- Use a sharp box cutter.
- Starting from the edge of the panel, carefully cut each polycarbonate strip.
- Slightly flex the panel as needed to access each strip with the blade.
- Expect the polycarbonate strips to be sacrificed – they will not be reusable, but this helps preserve the panel.
B. Limit Panel Flexing
- Avoid bending or twisting the panel more than necessary while lifting it.
- Excessive flexing can damage internal cells and reduce performance.
C. Remove Residual Adhesive
- Once the panel is off, use a heat gun to gently warm the remaining adhesive.
- Scrape or peel the softened adhesive away.
- Finish by cleaning the area with a dewaxing agent to remove residue.
Scenario 2: If VHB Tape Was Used
If the panels are mounted directly with VHB tape, you have two main options.
Option 1: Spatula Method
- Start at one accessible edge of the panel.
- Carefully slide a spatula (or similar thin tool) between the panel and the roof.
- Work strip by strip along the tape, gradually separating the panel from the adhesive.
- As before, avoid excessive flexing of the panel while you lift.
- After removal, use a heat gun to soften remaining VHB tape and scrape it off.
- Clean the surface with a dewaxing agent.
Option 2: Piano Wire Method
- Use thin stranded piano wire.
- Feed the wire under the panel and around one of the VHB adhesive strips.
- Using a gentle sawing motion, work the wire back and forth to separate the tape from the roof surface.
- Continue this along each strip, being careful not to flex the panel too much.
- Again, use a heat gun to remove any leftover adhesive and finish with a dewaxing agent.
Cleaning Off Adhesive and Residue
- Removing the leftover adhesive is often the most time‑consuming part.
- A heat gun can soften stubborn adhesive, making it easier to scrape.
- A decal remover wheel (e.g. Velocity Stripe Removal Wheel) can help, but use cautiously to avoid damaging the roof.
- Dewaxing / adhesive removal agents such as:
- Prepsol
- WD‑40
- Goo Gone
- Try these in a small, inconspicuous area first to ensure they don’t damage the roof or the back of the panel.
- IPA (Isopropyl Alcohol) can be used as a final wipe to remove any oily residue left behind by other products.
Testing Panels After Removal
Before you reinstall or reuse the panels:
- Fully test each panel according to the procedures in our Guide “Comprehensive Guide to Testing Solar Panels: Isc and Voc.”
- Confirm that voltage (Voc) and current (Isc) readings are within expected ranges for the panel model.
Only remount panels that pass testing to avoid issues in the new installation.
Helpful Products & References
Here are some items mentioned in this guide that you may find useful:
We trust this guide makes the process smoother and increases your chances of successfully removing and re‑using your flexible or lightweight solar panels.
We'll keep you updated with the latest deals, so that you'll never miss out!